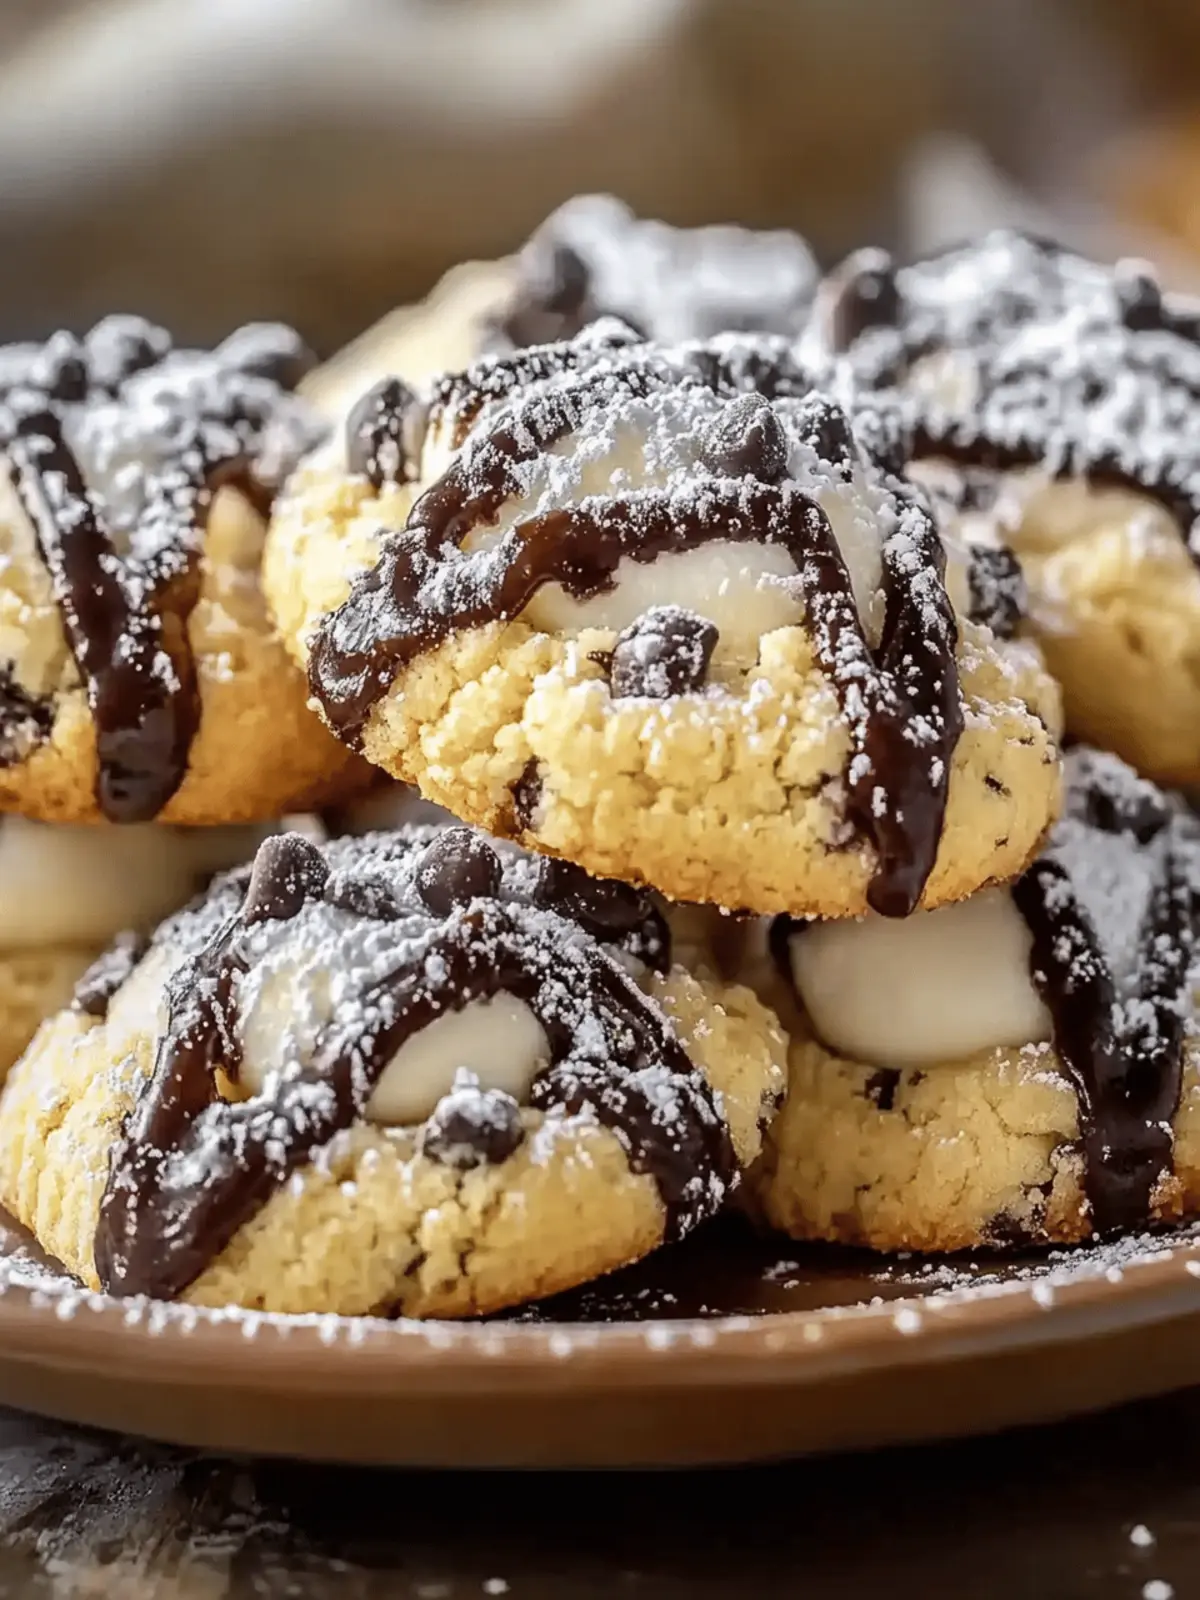
There’s something undeniably heartwarming about the scent of baked goods wafting through the kitchen, especially when those treats carry a bit of family history. Recently, as I sifted through cherished recipes passed down from my grandmother, I stumbled upon her Cannoli Cookies—a delightful twist on the classic Italian dessert. With their rich, creamy filling wrapped in a tender, slightly crisp exterior, these cookies are more than just a treat; they evoke memories of family gatherings and celebrations, creating a sense of togetherness with every bite.
What I love most about these Cannoli Cookies is their versatility; they enchant everyone, from busy families looking for easy dessert solutions to those who want a sophisticated sweet for special occasions. Whether you’re sharing them at a potluck or savoring them with your morning coffee, these cookies are sure to impress. Plus, with gluten-free substitutions available, everyone can enjoy this sweet homage to tradition. Let’s dive into this delicious journey and create something magical together!
Why Choose Cannoli Cookies for Your Next Bake?
Versatile Delight: These Cannoli Cookies cater to everyone, easily adapting to different occasions—be it a casual family gathering or an elegant celebration.
Flavor Explosion: The creamy ricotta filling combines harmoniously with a hint of cinnamon, offering a burst of flavor in every bite.
Nostalgic Touch: Each cookie carries the warmth of tradition, infused with a sense of family history that makes them extra special.
Easy to Make: With straightforward steps, this recipe is perfect even for beginner bakers. You’ll impress loved ones without the stress!
Gluten-Free Options: No one misses out! You can easily substitute gluten-free ingredients for a universally enjoyable treat.
For inspiration on variations, check out how to create Cinnamon Sweet Potato Breakfast Cookies for an exciting twist!
Cannoli Cookies Ingredients
For the Dough
• All-Purpose Flour – Provides structure to the cookies; can be substituted with gluten-free flour for a different dietary need.
• Baking Powder – Helps the cookies rise and become light; no direct substitute recommended.
• Salt – Enhances flavor and balances sweetness; don’t skip this step!
• Unsalted Butter – Adds richness and moisture; can swap with coconut oil for a dairy-free version.
• Granulated Sugar – Sweetens the dough beautifully; consider brown sugar for a deeper flavor.
• Large Egg – Binds everything together; a flax egg can work well as a vegan alternative.
• Vanilla Extract – Adds depth; opt for high-quality for the best flavor.
For the Filling
• Ricotta Cheese – The star of the show, providing creamy goodness; mascarpone can be used for extra richness.
• Powdered Sugar – Sweetens the filling and creates that smooth texture; sugar alternatives can be used for lower sugar diets.
• Cinnamon – Infuses warmth and spice; adjust to your taste, or use nutmeg for a different touch.
• Mini Chocolate Chips – Offer sweetness and a pleasing texture contrast; dark chocolate is a delicious option too.
For Coating
• Cinnamon-Sugar Mixture – Perfect for rolling the cookies; mix granulated sugar with cinnamon to your preference.
Cannoli Cookies truly capture the essence of family tradition with their creamy filling and delightful exterior. With these ingredients on hand, you’re just a few steps away from creating a sweet treat that will fill your kitchen with love!
How to Make Cannoli Cookies
-
Preheat Oven: Set your oven to 350°F (175°C) and line a baking sheet with parchment paper. This ensures your cookies won’t stick and will bake evenly!
-
Mix Dry Ingredients: In a medium bowl, whisk together all-purpose flour, baking powder, and salt until well combined. This creates a light and airy structure for your cookies.
-
Cream Butter and Sugar: In a large mixing bowl, beat unsalted butter and granulated sugar until the mixture is light and fluffy, about 2-3 minutes. Then, add in the egg and vanilla extract to create a rich base.
-
Combine Mixtures: Gradually add the dry ingredients to the wet mixture, mixing until just combined. Be careful not to overmix; we want those cookies tender!
-
Prepare Filling: In a separate bowl, blend the ricotta cheese, powdered sugar, cinnamon, and mini chocolate chips. This creamy filling is what makes your Cannoli Cookies truly special.
-
Shape Cookies: Roll the dough into 1-inch balls, rolling them in cinnamon-sugar for a sweet coating. Flatten each ball slightly before placing it on the baking sheet.
-
Bake: Bake your cookies in the preheated oven for 10-12 minutes, or until the edges are lightly golden. Keep an eye on them, as oven temperatures can vary!
-
Cool: Allow the cookies to cool on the baking sheet for 5 minutes before transferring them to a wire rack. This helps them set and makes them easier to handle.
-
Assemble: Spread a generous layer of the ricotta filling on one cookie, sandwiching it with another cookie on top. Repeat until all cookies are assembled and enjoy!
Optional: Dust with extra powdered sugar before serving for a beautiful finish.
Exact quantities are listed in the recipe card below.
Expert Tips for Cannoli Cookies
Well-Drained Ricotta: Ensure your ricotta cheese is well-drained to prevent a runny filling, which can lead to messy sandwiches.
Flavor Boost: For added depth, incorporate a splash of orange zest into the ricotta filling. A little citrus can brighten those flavors!
Avoid Overmixing: When combining wet and dry ingredients, mix until just combined. Overmixing can result in tough cookies instead of tender ones.
Storage Caution: Store cookies in an airtight container at room temperature. Avoid stacking directly to maintain their crisp texture.
Chill the Dough: If time allows, chill the dough for 30 minutes before shaping. This can enhance the flavor and texture of your Cannoli Cookies.
What to Serve with Cannoli Cookies?
These delightful cookies are perfect for crafting a memorable meal experience, filled with warmth and flavor.
-
Italian Espresso: The robust flavor of espresso perfectly complements the sweet, creamy notes in the cookies, elevating their taste.
-
Fruit Salad: A refreshing mix of seasonal fruits adds a burst of freshness and balances the sweetness of the cookies wonderfully.
-
Pistachio Gelato: The nutty creaminess of pistachio gelato echoes the filling’s richness and adds an impressive touch to your dessert spread.
-
Chocolate Dipping Sauce: Serve warm chocolate sauce alongside for dipping, offering a decadent twist to each bite and elevating the cookie experience.
-
Sweet Dessert Wine: A glass of Moscato or vin santo enhances the sweetness of the cookies, making each bite even more indulgent.
-
Herbal Tea: A mild herbal tea can cleanse the palate, contrasting beautifully with the flavors packed into these cookies and leaving a lasting impression.
These pairing ideas are sure to create the perfect atmosphere for enjoying your homemade Cannoli Cookies!
Make Ahead Options
These Cannoli Cookies are a fantastic option for meal prep, perfect for busy home cooks who want to save time without sacrificing flavor! You can prepare the dough up to 24 hours in advance; just wrap it tightly in plastic wrap and refrigerate. The filling can also be made ahead and stored in the fridge for up to 3 days—be sure to keep it in an airtight container to maintain its creamy texture. When you’re ready to bake, roll the dough into balls, coat them in cinnamon-sugar, and bake as directed. You’ll enjoy the same delightful taste of fresh-baked Cannoli Cookies with minimal effort on the day of serving!
How to Store and Freeze Cannoli Cookies
Room Temperature: Keep Cannoli Cookies in an airtight container at room temperature for up to 3 days to preserve their delightful texture and flavor.
Fridge: For longer freshness, store cookies in the refrigerator. This extends their life up to 5 days, but may alter their texture slightly.
Freezer: Freeze assembled Cannoli Cookies in an airtight container for up to 1 month. Thaw at room temperature before enjoying for the best taste.
Reheating: If desired, reheat individual cookies in the microwave for a few seconds to restore warmth, enhancing that gooey filling.
Cannoli Cookies Variations & Substitutions
Feel free to get creative with these Cannoli Cookies and customize them to your heart’s desire!
- Gluten-Free: Substitute all-purpose flour with a high-quality gluten-free flour blend to keep everyone happy.
- Dairy-Free: Use coconut oil in place of unsalted butter for a rich, vegan-friendly treat.
- Sweetener Swap: Replace granulated sugar with coconut sugar or a sugar alternative for a lower-calorie option.
- Fruit Infusion: Add dried fruit like cherries or raisins to the filling for a delightful burst of flavor.
- Nutty Crunch: Stir in crushed pistachios or almonds into the filling for an exciting textural twist.
- Citrus Zest: Include a hint of lemon or orange zest in the ricotta filling for a refreshing kick.
- Chocolate Delight: Mix mini chocolate chips with dark chocolate chunks for a decadent chocolate explosion.
- Spicy Surprise: Add a pinch of cayenne pepper or chili powder to the cinnamon sugar for a surprising heat that complements the sweetness.
Whichever choice you make, these variations will undoubtedly elevate your Cannoli Cookies to new delicious heights!
Cannoli Cookies Recipe FAQs
What type of ricotta should I use for the filling?
Absolutely! Make sure to use whole milk ricotta cheese for the creamiest filling. To avoid a runny consistency, drain the ricotta in a fine mesh strainer for an hour or so beforehand. If needed, mascarpone can also be a delicious substitute for an even richer filling.
How long can I store Cannoli Cookies?
You can store Cannoli Cookies in an airtight container at room temperature for up to 3 days. However, for extended freshness, they can be refrigerated for about 5 days. Just be aware that refrigeration may slightly alter the texture, making them a bit softer.
Can Cannoli Cookies be frozen?
Yes! To freeze Cannoli Cookies, arrange them in a single layer on a baking sheet and freeze until solid. Then, place them in an airtight container or a freezer-safe bag for up to 1 month. Thaw them at room temperature before serving to enjoy their delightful flavors.
How can I prevent my Cannoli Cookies from spreading too much during baking?
To avoid spreading, make sure your dough is well-chilled for at least 30 minutes before baking. Additionally, if you notice your butter is too soft when you’re creaming it with sugar, try placing the mixture in the refrigerator before shaping your cookies. This helps them maintain their shape.
Are Cannoli Cookies suitable for people with gluten intolerance?
Very! You can easily make these Cannoli Cookies gluten-free by substituting the all-purpose flour with a gluten-free flour blend. Just be sure to check that all other ingredients, especially baking powder and any added mixes, are labeled gluten-free to keep it safe for individuals with gluten intolerance.
Can I incorporate other flavors into the filling?
Absolutely! Feel free to customize the filling by adding a splash of vanilla or almond extract. You can also mix in additional spices like nutmeg or even a bit of orange zest to brighten up the flavors. The more, the merrier when it comes to flavor!

Delicious Cannoli Cookies That Bring Family Tradition Home
Ingredients
Equipment
Method
- Preheat Oven: Set your oven to 350°F (175°C) and line a baking sheet with parchment paper.
- Mix Dry Ingredients: In a medium bowl, whisk together all-purpose flour, baking powder, and salt.
- Cream Butter and Sugar: In a large mixing bowl, beat unsalted butter and granulated sugar until light and fluffy, then add in the egg and vanilla extract.
- Combine Mixtures: Gradually add the dry ingredients to the wet mixture, mixing until just combined.
- Prepare Filling: In a separate bowl, blend the ricotta cheese, powdered sugar, cinnamon, and mini chocolate chips.
- Shape Cookies: Roll the dough into 1-inch balls and roll in cinnamon-sugar. Flatten slightly and place on the baking sheet.
- Bake: Bake for 10-12 minutes until the edges are lightly golden.
- Cool: Allow cookies to cool on the baking sheet for 5 minutes before transferring to a wire rack.
- Assemble: Spread a layer of the ricotta filling on one cookie, sandwich with another cookie.


